
Subscribe to our Blog
We're committed to your privacy. SayOne uses the information you provide to us to contact you about our relevant content, products, and services. check out our privacy policy.

Generating table of contents...
It was a simple idea to create a replica of iPhone’s system calculator in Flutter. The design is uncomplicated and the program logic is well-known. I am trying to focus on the UI designhere, since the logic can be tedious to teach.
You can check out our Git Repo to get a complete idea.
This is the UI we got to design.
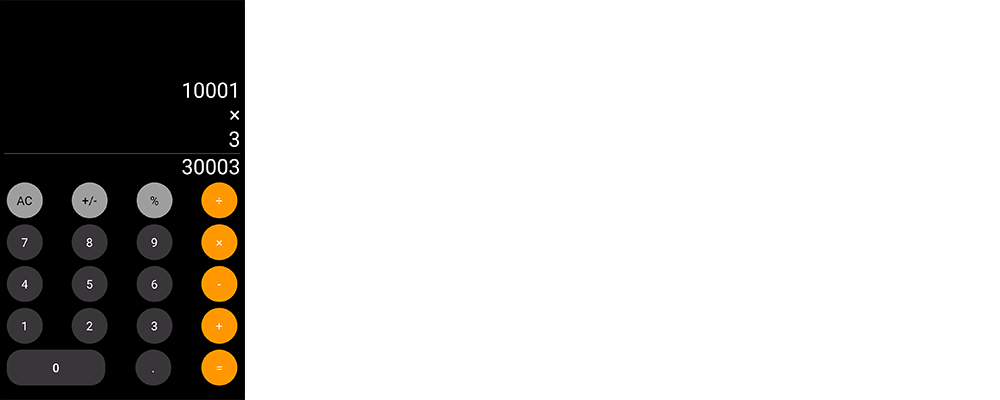
Now, let’s decompose this view into a number of components.
The Number Button is designed like this:
| import 'package:flutter/material.dart'; | |
| class NumberButton extends StatelessWidget { | |
| NumberButton({this.text,this.onPressed}); | |
| final String text; | |
| final Function onPressed; | |
| @override | |
| Widget build(BuildContext context) { | |
| return Padding( | |
| padding: const EdgeInsets.all(5.0), | |
| child: RawMaterialButton( | |
| shape: const CircleBorder(), | |
| constraints: BoxConstraints.tight(Size(60.0, 60.0)), | |
| onPressed:onPressed, | |
| child: Text( | |
| text, | |
| style: TextStyle(color: Colors.white, fontSize: 20.0), | |
| ), | |
| fillColor: Color.fromRGBO(56, 54, 56, 1.0), | |
| )); | |
| } | |
| } |
view rawNumber-button.dart hosted with ❤ by GitHub
The Number Button is a Stateless widget which takes a String “text” and a function “onPressed”. It is implemented using a RawMaterialButton because we needed the button size to be extra large. The shape is given to be a circle of size 60.
The Zero button has a bit different UI, so I created a custom widget for it.
| import 'package:flutter/material.dart'; | |
| class ZeroButton extends StatelessWidget { | |
| ZeroButton({this.onPressed}); | |
| final Function onPressed; | |
| @override | |
| Widget build(BuildContext context) { | |
| return Padding( | |
| padding: const EdgeInsets.all(5.0), | |
| child: Container( | |
| height: 60.0, | |
| width: MediaQuery.of(context).size.width / 2.5, | |
| decoration: BoxDecoration( | |
| borderRadius: BorderRadius.circular(25.0), | |
| color: Color.fromRGBO(56, 54, 56, 1.0)), | |
| child: MaterialButton( | |
| onPressed: onPressed, | |
| child: Text( | |
| "0", | |
| style: TextStyle(color: Colors.white, fontSize: 20.0), | |
| ), | |
| ), | |
| ), | |
| ); | |
| } | |
| } |
view rawCustom-Widget-ZeroButton.dart hosted with ❤ by GitHub
The width of the zero button is given in relative to the screen width.
Now there is Binary Operator button and Unary Operator Button which is different from each other only in text color, background color and its action.
| import 'package:flutter/material.dart'; | |
| class BinaryOperatorButton extends StatelessWidget { | |
| BinaryOperatorButton({this.onPressed,this.text}); | |
| final text; | |
| final Function onPressed; | |
| @override | |
| Widget build(BuildContext context) { | |
| return Padding( | |
| padding: const EdgeInsets.all(5.0), | |
| child: RawMaterialButton( | |
| shape: const CircleBorder(), | |
| constraints: BoxConstraints.tight(Size(60.0, 60.0)), | |
| onPressed:onPressed, | |
| child: Text( | |
| text, | |
| style: TextStyle(color: Colors.white, fontSize: 20.0), | |
| ), | |
| fillColor: Colors.orange, | |
| )); | |
| } | |
| } |
view rawButton1.dart hosted with ❤ by GitHub
| import 'package:flutter/material.dart'; | |
| class UnaryOperatorButton extends StatelessWidget { | |
| UnaryOperatorButton({this.text,this.onPressed}); | |
| final String text; | |
| final Function onPressed; | |
| @override | |
| Widget build(BuildContext context) { | |
| return Padding( | |
| padding: const EdgeInsets.all(5.0), | |
| child: RawMaterialButton( | |
| shape: const CircleBorder(), | |
| constraints: BoxConstraints.tight(Size(60.0, 60.0)), | |
| onPressed:onPressed, | |
| child: Text( | |
| text, | |
| style: TextStyle(color: Colors.black, fontSize: 20.0), | |
| ), | |
| fillColor: Colors.grey, | |
| )); | |
| } | |
| } |
view rawButton2.dart hosted with ❤ by GitHub
Now the entire layout is done in calculator.dart. The build method of it is given below.
| @override | |
| Widget build(BuildContext context) { | |
| return new Scaffold( | |
| backgroundColor: Theme.of(context).primaryColor, | |
| body: SafeArea( | |
| child: Padding( | |
| padding: const EdgeInsets.all(8.0), | |
| child: Column( | |
| children: <Widget>[ | |
| Expanded( | |
| child: Container( | |
| child: Align( | |
| alignment: Alignment.bottomRight, | |
| child: Column( | |
| crossAxisAlignment: CrossAxisAlignment.end, | |
| mainAxisAlignment: MainAxisAlignment.end, | |
| children: <Widget>[ | |
| operand1 != null | |
| ? SingleChildScrollView( | |
| scrollDirection: Axis.horizontal, | |
| child: Text( | |
| operand1 is double | |
| ? operand1.toStringAsFixed(2) | |
| : operand1.toString(), | |
| style: _whiteTextStyle, | |
| textAlign: TextAlign.right, | |
| ), | |
| ) | |
| : Container(), | |
| operator != null | |
| ? Text( | |
| operator.toString(), | |
| style: _whiteTextStyle, | |
| textAlign: TextAlign.right, | |
| ) | |
| : Container(), | |
| operand2 != null | |
| ? Text( | |
| operand2.toString(), | |
| style: _whiteTextStyle, | |
| textAlign: TextAlign.right, | |
| ) | |
| : Container(), | |
| result != null | |
| ? Divider( | |
| height: 5.0, | |
| color: Colors.white, | |
| ) | |
| : Container(), | |
| result != null | |
| ? SingleChildScrollView( | |
| scrollDirection: Axis.horizontal, | |
| child: Text( | |
| result is double | |
| ? result.toStringAsFixed(2) | |
| : result.toString(), | |
| style: _whiteTextStyle, | |
| textAlign: TextAlign.right, | |
| ), | |
| ) | |
| : Container(), | |
| ], | |
| ), | |
| ), | |
| ), | |
| ), | |
| Row( | |
| mainAxisAlignment: MainAxisAlignment.spaceBetween, | |
| children: <Widget>[ | |
| UnaryOperatorButton( | |
| text: "AC", | |
| onPressed: () { | |
| _otherOperationAction(OtherOperation.clear); | |
| }, | |
| ), | |
| UnaryOperatorButton( | |
| text: plus_or_minus_sign, | |
| onPressed: (){_unaryOperationAction(UnaryOperation.changeSign);}, | |
| ), | |
| UnaryOperatorButton( | |
| text: percent_sign, | |
| onPressed: (){_unaryOperationAction(UnaryOperation.percent);}, | |
| ), | |
| BinaryOperatorButton( | |
| text: divide_sign, | |
| onPressed: () { | |
| _binaryOperationAction(BinaryOperation.divide); | |
| }, | |
| ) | |
| ], | |
| ), | |
| Row( | |
| mainAxisAlignment: MainAxisAlignment.spaceBetween, | |
| children: <Widget>[ | |
| NumberButton( | |
| text: "7", | |
| onPressed: () { | |
| _numberButtonAction("7"); | |
| }), | |
| NumberButton( | |
| text: "8", | |
| onPressed: () { | |
| _numberButtonAction("8"); | |
| }), | |
| NumberButton( | |
| text: "9", | |
| onPressed: () { | |
| _numberButtonAction("9"); | |
| }), | |
| BinaryOperatorButton( | |
| text: multiply_sign, | |
| onPressed: () { | |
| _binaryOperationAction(BinaryOperation.multiply); | |
| }, | |
| ) | |
| ], | |
| ), | |
| Row( | |
| mainAxisAlignment: MainAxisAlignment.spaceBetween, | |
| children: <Widget>[ | |
| NumberButton( | |
| text: "4", | |
| onPressed: () { | |
| _numberButtonAction("4"); | |
| }), | |
| NumberButton( | |
| text: "5", | |
| onPressed: () { | |
| _numberButtonAction("5"); | |
| }), | |
| NumberButton( | |
| text: "6", | |
| onPressed: () { | |
| _numberButtonAction("6"); | |
| }), | |
| BinaryOperatorButton( | |
| text: minus_sign, | |
| onPressed: () { | |
| _binaryOperationAction(BinaryOperation.subtract); | |
| }, | |
| ) | |
| ], | |
| ), | |
| Row( | |
| mainAxisAlignment: MainAxisAlignment.spaceBetween, | |
| children: <Widget>[ | |
| NumberButton( | |
| text: "1", | |
| onPressed: () { | |
| _numberButtonAction("1"); | |
| }), | |
| NumberButton( | |
| text: "2", | |
| onPressed: () { | |
| _numberButtonAction("3"); | |
| }), | |
| NumberButton( | |
| text: "3", | |
| onPressed: () { | |
| _numberButtonAction("3"); | |
| }), | |
| BinaryOperatorButton( | |
| text: add_sign, | |
| onPressed: () { | |
| _binaryOperationAction(BinaryOperation.add); | |
| }, | |
| ) | |
| ], | |
| ), | |
| Row( | |
| mainAxisAlignment: MainAxisAlignment.spaceBetween, | |
| children: <Widget>[ | |
| ZeroButton(onPressed: (){_zeroButtonAction();},), | |
| BinaryOperatorButton( | |
| text: ".", | |
| onPressed: () { | |
| _otherOperationAction(OtherOperation.addDecimal); | |
| }, | |
| ), | |
| BinaryOperatorButton( | |
| text: equal_sign, | |
| onPressed: () { | |
| _otherOperationAction(OtherOperation.equals); | |
| }, | |
| ) | |
| ], | |
| ), | |
| ], | |
| ), | |
| ), | |
| ), | |
| ); |
view rawcalculator.dart hosted with ❤ by GitHub
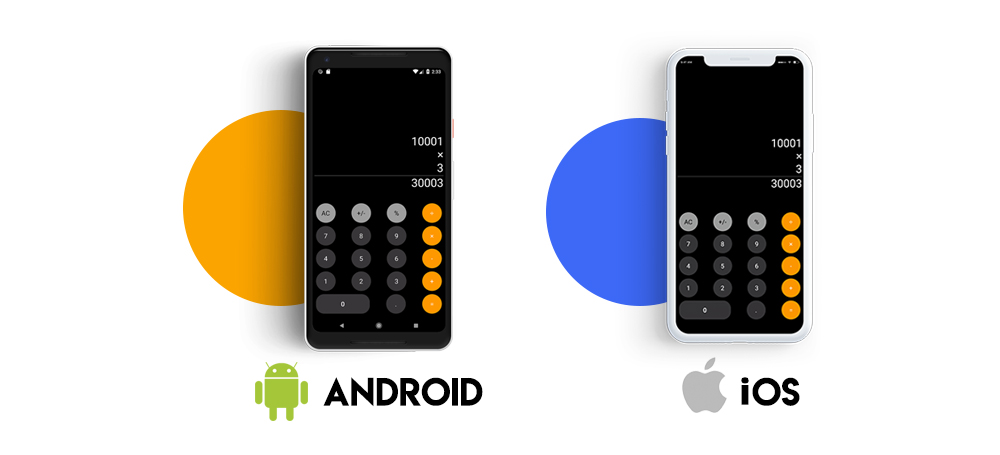
This is how it looks on both the devices. My Flutter experiment has worked out for good. As a part of the SayOne mobile team, I have been working on Flutter since 2017. I have never been this drawn towards any other technology. Stay tuned as we experiment more with Flutter in the coming days!
Download Now: Development process for the layperson and what does it take to build an application [Get Your Copy]
SayOne Tech, a technology company with offices in India and the USA, has proven expertise and experience in employing emerging technologies to deliver world-class, secure, scalable, and reliable solutions. The tech company strongly believes in empowering their clients to adapt to constantly changing business environments quickly and achieve their goals. The core values that SayOne is c passionate about are integrity, commitment, and transparency.
We're committed to your privacy. SayOne uses the information you provide to us to contact you about our relevant content, products, and services. check out our privacy policy.

We collaborate with visionary leaders on projects that focus on quality